Skip to the guide

One clear route to a finished result

Make a shot without feeling lost.

Start with one shot and one image you like. Studio keeps the work in five phases: Prepare, Direct, Generate, Review, and Deliver. Add video and advanced edits after your first result. A script is optional.

  • The phase navigation shows where you are and what comes next.
  • Planning and navigation never start a paid generation.
  • Studio shows the provider, settings, and maximum cost before payment.
  • Your selected cast, location, shot, and approved take stay together.
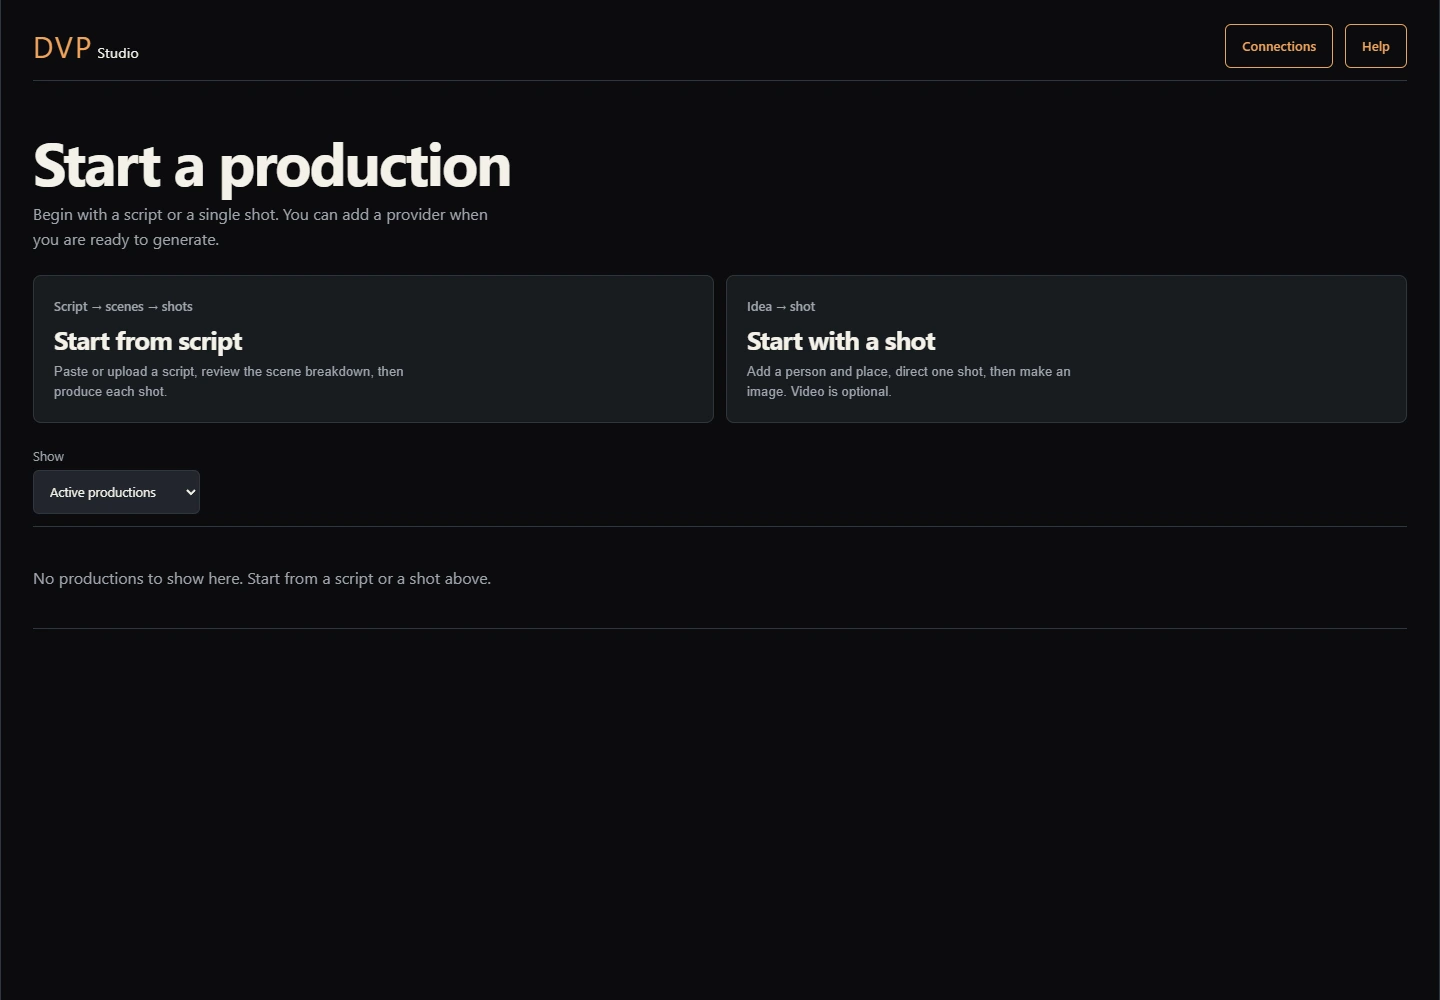
DVP AI Studio Start screen with equal choices to start from a script or start with a shot
Start here Choose the starting method that matches what you have.

Your first Quick Shot

Get started fast: one shot, one image.

You do not need to configure every tool. Follow this route first, then return for the optional steps below.

  1. Create a production. Open Studio, choose Start with a shot, give it a name, then choose Create production. Save any existing work before replacing its device copy.
  2. Prepare one shot. Describe the action and give the location a name and visual description. Choose No recurring character in this scene to go straight to Generate. For recurring cast or detailed location editing, continue through Cast & Set. Some image models still require an approved reference.
  3. Direct: describe one frame. Keep one shot, choose its aspect ratio and describe what should be visible. Try: “A close shot of a red ceramic cup beside a rain-covered window, soft morning light, no people.” Apply any pending direction changes before cost review.
  4. Save your starting point. Choose Save to account and wait for Account copy up to date. Keep the tab open and resolve a failed save before spending.
  5. Generate: choose one ordinary still. Open Connections if a provider is missing, then load the image models and select one available to your account. Make several alternatives is optional. If your model needs a reference, add an approved image or choose a compatible model.
  6. Review the price, then render. Choose Review cost and settings. Check the references, model, settings and maximum charge, then confirm and start the render. Opening a review does not buy a generation.
  7. Choose your take. Inspect the returned image and approve the result you want to use. Approval selects an existing take; it does not generate another image. Earlier takes stay available.
  8. Review and Deliver: save the result. Open Review to check your choices, then Deliver. Use Export production for a backup. On a paired PC, Settings → Media archive keeps separate copies of generated files. Export an editor handoff when Review says the cut is ready.
Four words to know. A production is your project. A shot is one planned camera view or beat. A take is one saved image or video result. An approved take is the result you have chosen to use.

After your first image

  • Add motion: in Generate, switch to Video, use your approved still and review the movement, duration and price. Animate selected shots lets you choose only the shots you want. Watch and approve the new video separately.
  • Explore alternatives: variations make two to four separate paid image requests. Each result needs your review.
  • Change a bounded area: Edit area keeps the original and creates a new take. The model is asked to preserve the rest; unchanged pixels are not guaranteed.
Spending and recovery. A Studio spending cap does not add funds to your provider API account. If a job is running or its submission is uncertain, reopen and recover the saved run instead of starting another render. A completed result may retain an unverified-charge warning while its reviewed upper amount stays counted. A production backup excludes the media files, so archive those separately.

Availability depends on your account and connected model. The detailed checkpoints below sit within the five phases; you can revisit them without generating media.

Before checkpoint 2

Choose the easiest way in.

Both routes join the same workflow. Pick the one that requires the least preparation.

Start from script

Paste or upload a script. Studio finds likely characters, locations, scenes, and shots. You review the plan before it creates anything in the production.

Best for: several scenes, a short film, an advert, or any project already written.

Start with a shot

Type one plain-language idea, then choose existing characters and a location. Studio creates one scene and one shot for you.

Best for: a still, a short clip, a test, or an idea without a script.

You can change your mind. Moving between checkpoints does not generate media or spend money. Use the five-phase rail to revisit earlier choices and open Checkpoints for the detailed path.
2

Plan

Turn the idea into a usable plan.

Studio prepares the structure before you choose visual references. Nothing is sent to an image or video provider here.

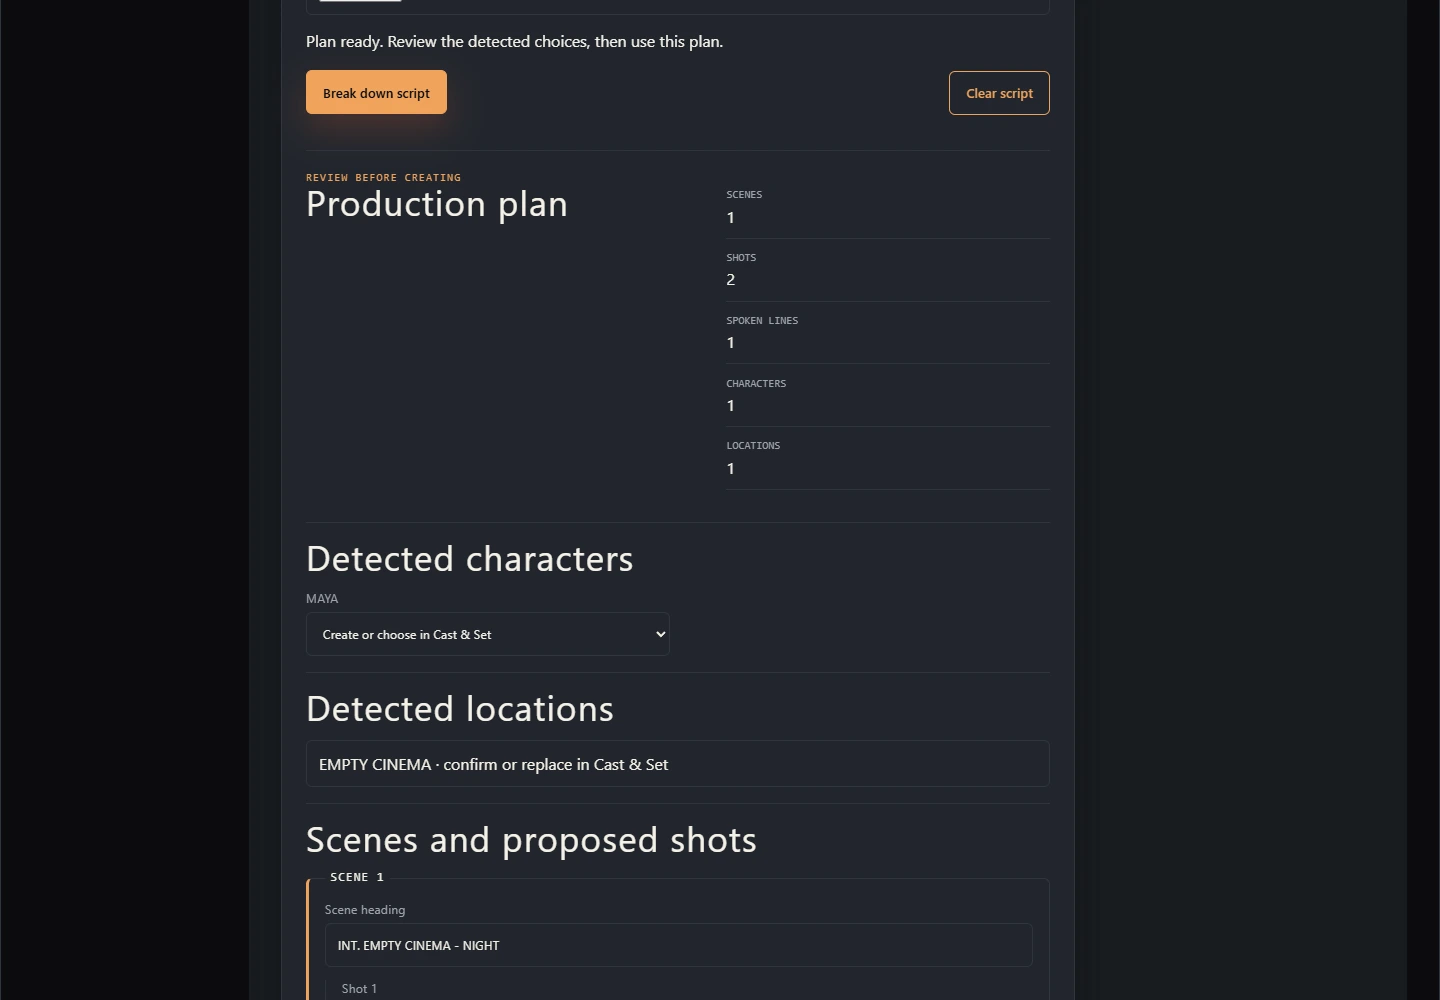
  1. Script route: paste or upload the script, then choose Prepare plan.
  2. Review what Studio found. Correct character names, scene headings, locations, and proposed shots.
  3. Check new locations. Script locations start as drafts so you can confirm or replace them later.
  4. Use the plan. Studio creates the production structure and takes you to Cast & Set.
If the production changes while a script plan is being prepared, Studio refuses an outdated plan and keeps the newer work. Review the script again before choosing Use this plan.
No-script example“Maya waits alone beneath the station clock while rain crosses the platform.”
Studio Plan stage reviewing detected characters, locations, scenes, and proposed shots from a script
1 Check the summary2 Correct the plan3 Use the plan
3

Cast & Set

Choose who appears and where.

This is the visual continuity stage. It works for both scripted productions and one-off images or videos.

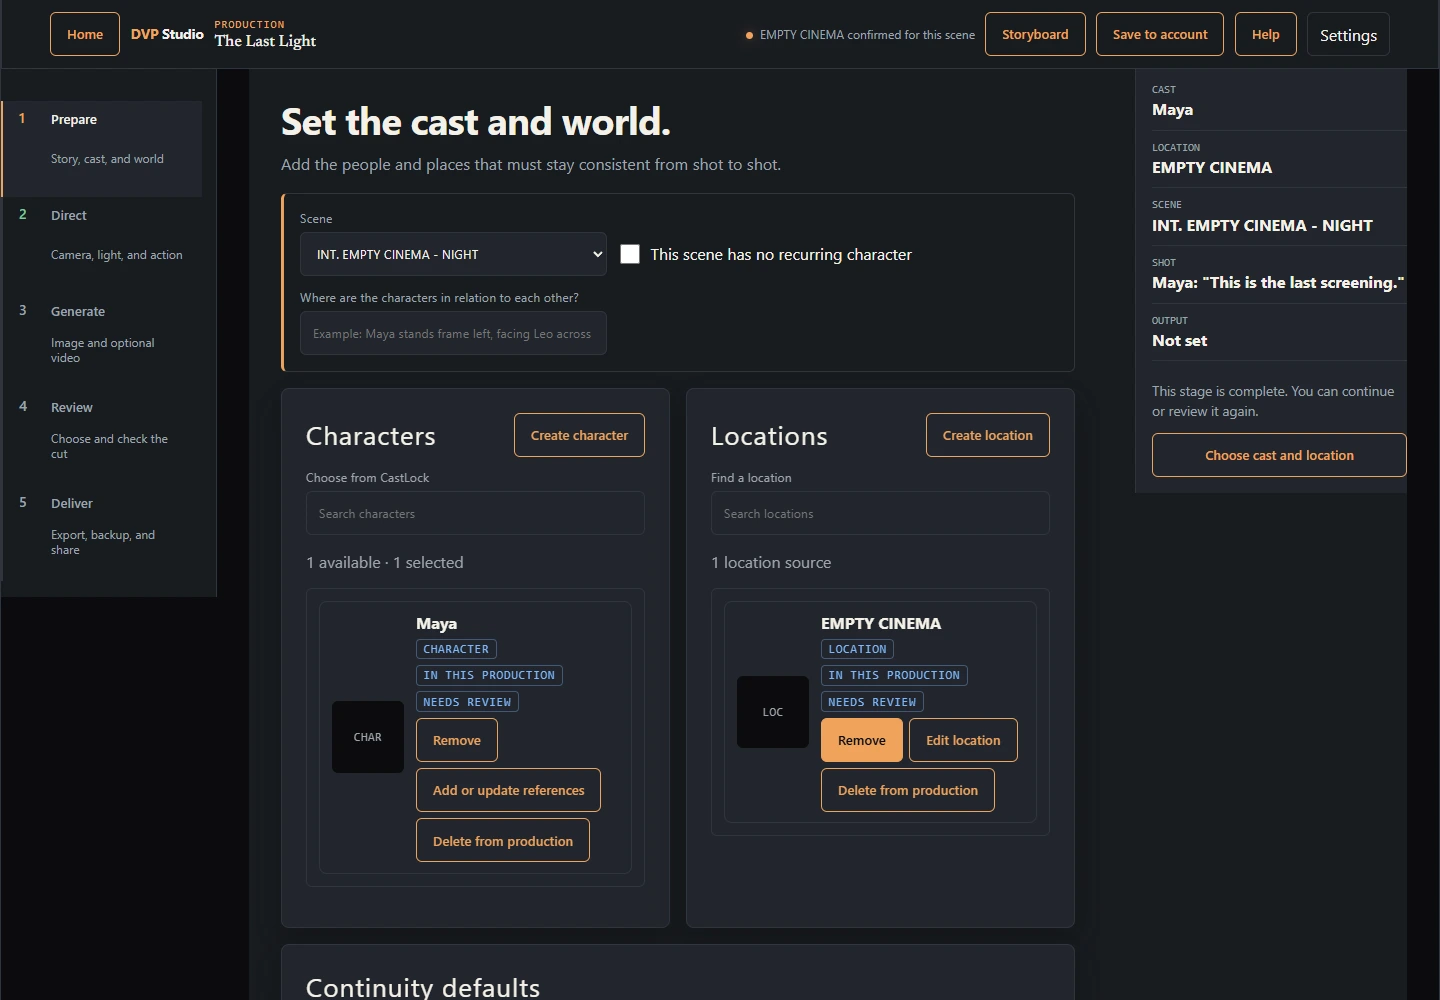
  1. Find a person or location. Search the library and choose Use in scene.
  2. Add more than one character when needed. Move them into the intended order and describe where they stand in relation to each other.
  3. Choose no cast for an empty scene. Select This scene has no recurring character for landscapes, product shots, and establishing shots.
  4. Confirm script locations. A detected location remains a draft until you approve or replace it.
  5. Generate a compact character pack. Choose Create character, generate or upload a front close-up, then choose Use as CastLoop identity. Choose Generate missing views to make profile and full-body drafts. Review each draft and add it to the pack before choosing Save and use in scene. Studio reuses the separate images in scene generation; Download three-view sheet makes a single image for models that need one reference.
Reference warning: If Studio cannot see an approved character reference, open Create or update character references, restore or create the reference, approve it, then return here.
Studio Cast and Set stage showing a chosen character, draft location, and continue to Shots action
1 Search the library2 Choose cast3 Confirm location
4

Shots

Describe what the camera should see.

Each shot combines the action with its framing. Plain language is enough; technical controls are available when you want them.

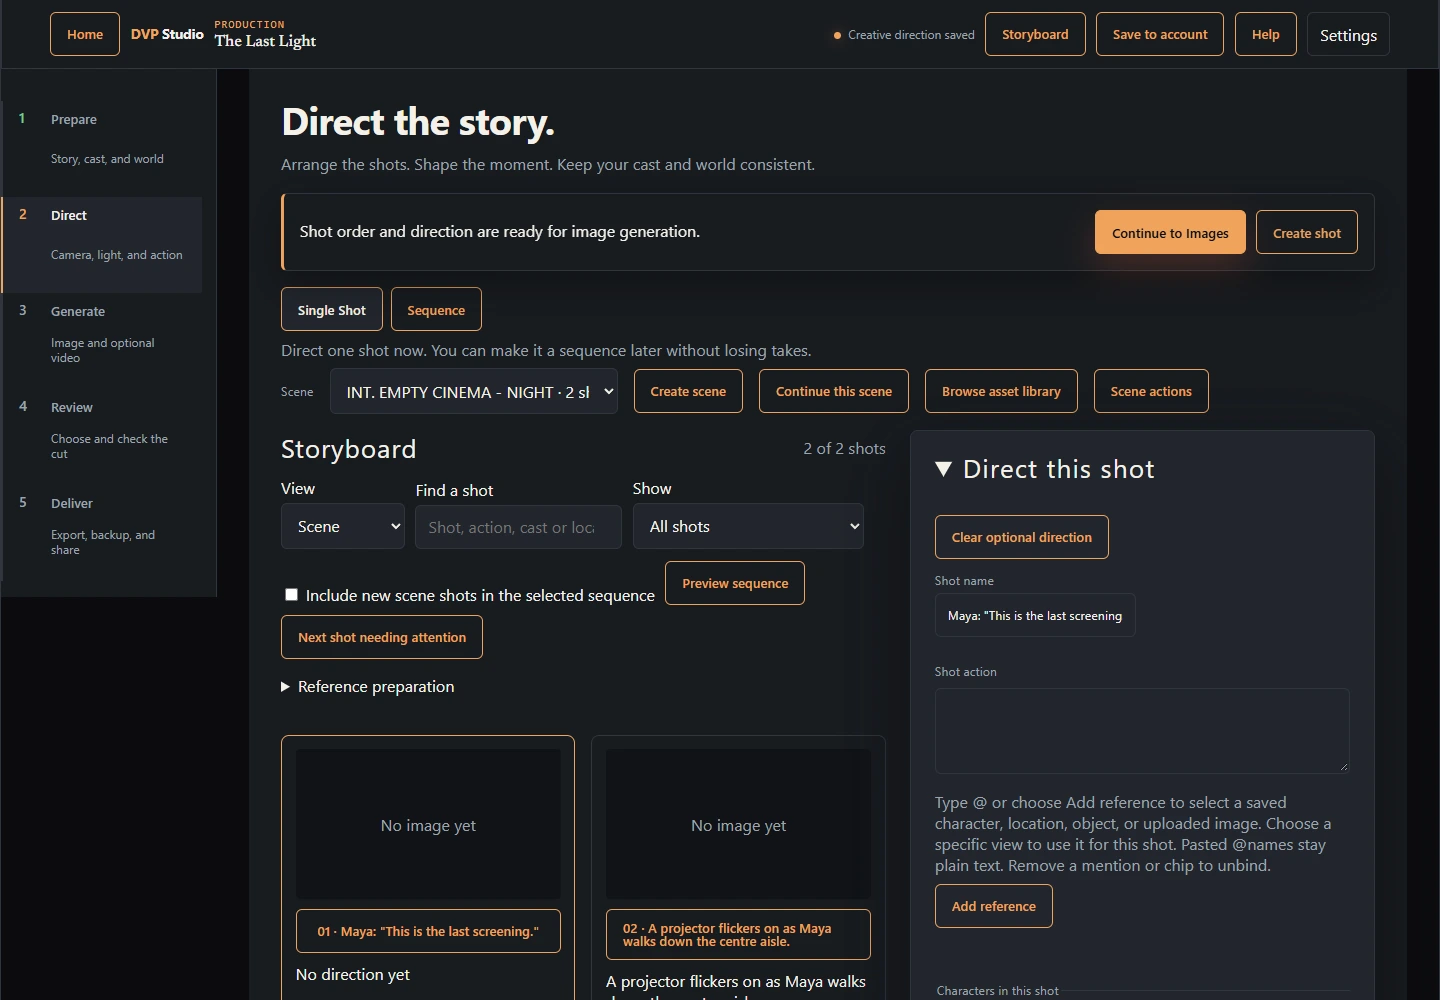
  1. Choose a scene and shot. Use the compact selectors above the shot description. Add scene and Add shot stay alongside them. The visual board follows the editor on a phone; scene order and sequence playback order are independent.
  2. Write the action. Say what happens, what must remain visible, and the intended feeling.
  3. Choose an output shape in Generate. Scene output shape applies to the scene. Review the affected shots before applying a change; choose a ratio supported by the selected model.
  4. Open Advanced direction only when useful. Cast, dialogue, lens, movement, composition, continuity, history, and technical prompt details remain beside the shot. The visible settings summary shows the effective values and where they come from.
  5. Reorder, duplicate, exclude, or restore shots. Use Earlier/Later or drag in an unfiltered Scene or Sequence view. Removing a shot from a sequence keeps its direction and takes. In Scene view, choose whether new shots join the selected sequence.
  6. Check Cast and continuity. Open continuity settings to choose wardrobe, expression, location state, and lighting variants. Labels distinguish scene settings, entity defaults, and shot overrides. Compare neighboring shots before spending.
  7. Carry an intentional change forward. Copy selected continuity fields to compatible shots after reviewing the targets. Continue this scene starts a fresh scene with the same cast, location, and defaults, plus one blank shot.
Clear shot direction“Wide view down the centre aisle. Maya walks toward the screen. Slow dolly forward. Four seconds.”
Studio Shots stage showing the shot board, scene intent, direction, output shape, and technical controls
Visual board, shot direction, and continuity in one workspace. Example production.
+

Shot dialogue

Give each spoken line its own place.

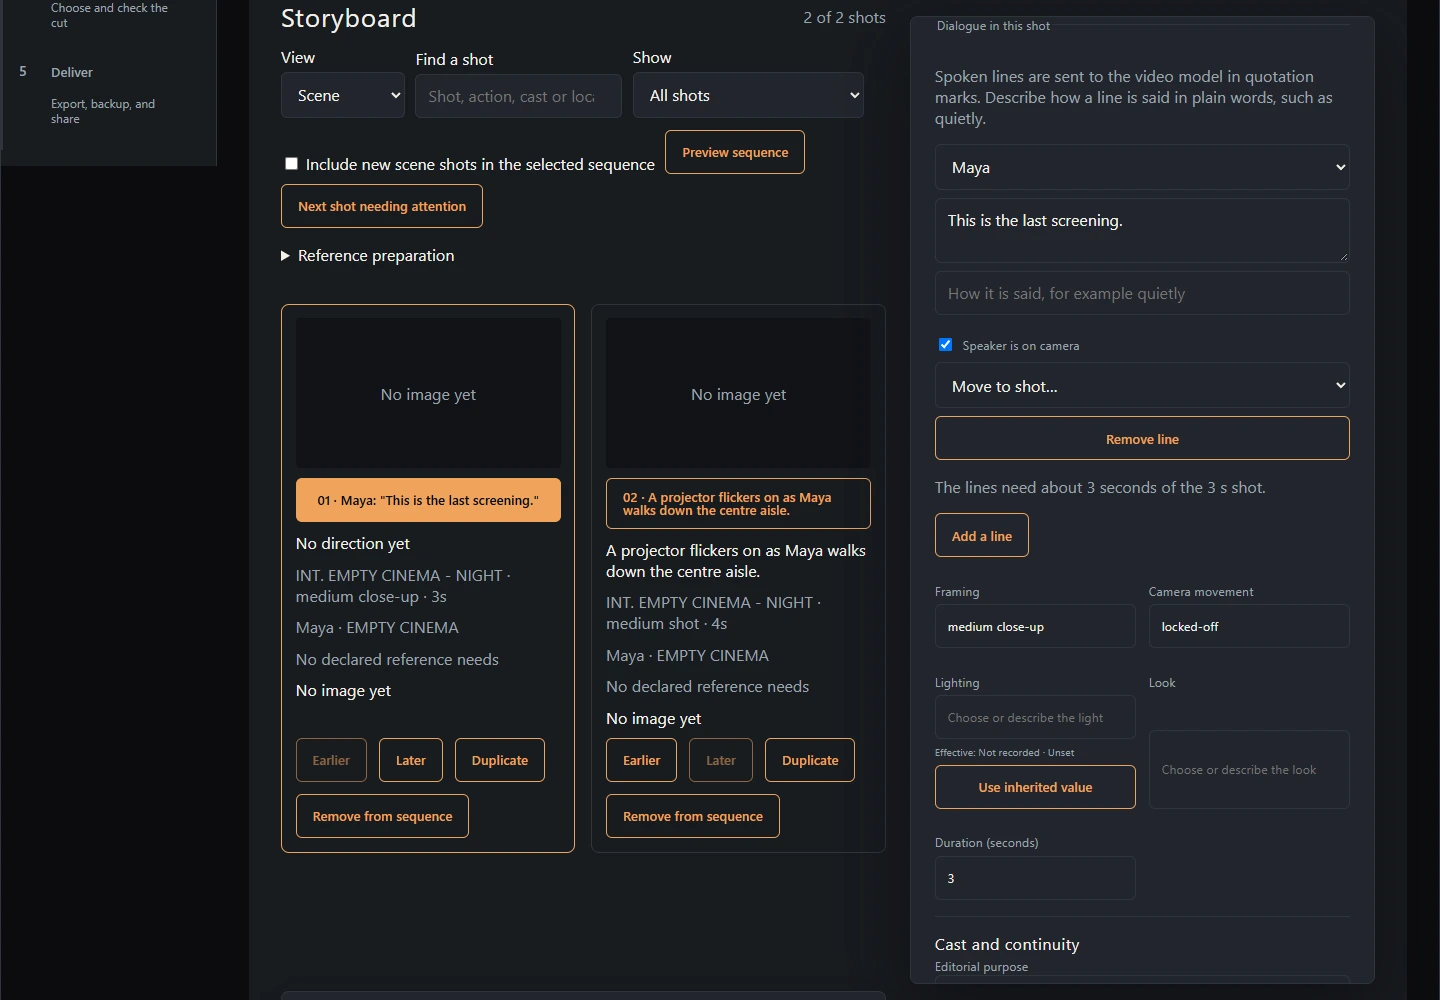
When you start from a script, Studio carries detected dialogue into the relevant shots. Check it in Direct before generating video; you can also add or edit lines yourself.

  1. Open a shot in Direct. Open Advanced direction to find Dialogue in this shot below the cast controls.
  2. Check the speaker and words. Add, edit, remove, or move lines between shots when the script breakdown needs correcting. Describe delivery in plain words, such as “quietly.”
  3. Review the video prompt. Technical prompt details shows a motion-only video prompt: the approved start image supplies the look, while spoken words are quoted for the video model.
The prompt describes what to ask the selected model to do; it does not guarantee audible speech or a matching voice. Review the resulting take before approving it.
Studio Direct shot editor showing a spoken line and its speaker in Dialogue in this shot
Example shot: inspect the speaker, words, and delivery before video generation.

See the production take shape.

Review variations and reuse a take

Take 1, Take 2, and later numbers follow the saved order. View a take without selecting it, or choose Use this take to approve it for the shot. Compare two takes of the same kind. Open Refine or reject for another direction, an area edit, character replacement, grading, or rejection when available. Refinement creates a new candidate; the original remains.

Favorites organize your work; approval selects a take for the shot. After approval, download the original image or video beside the shot, even while other shots are unfinished. Cut trims, timing and separately selected audio are not applied to that file. Use Review this shot for a managed cut; Animate this image is optional and has its own cost review.

Image reveal supports arrow keys. Video comparison starts only when you press Play both, pauses while buffering, and stops at the shorter clip. Choose one audio source or keep both muted. Edit image, Animate, and Vary direction keep their exact source and existing approval and cost review requirements.

Edit an area of an image

Open an existing image take, select an area, describe the change, and inspect the mask. Save the production to your account before cost review; the accepted selection must finish syncing. The model is asked to preserve the rest of the image, but unchanged pixels are not guaranteed. The result is a separate unapproved take; your original stays available for comparison and reuse. When a saved mask is available, choose Load saved selection to reopen its exact pixels as an unaccepted draft. You can brush, Undo, and Accept selection again; loading never restores cost approval or starts a render. If the saved mask is missing, retrace the area. To return to an ordinary still render, choose Discard prepared edit; Clear selection only changes the local mask draft. Rendering requires a qualified route and your explicit confirmation. If none is enabled, cost review explains the block and Render stays unavailable.

Use visual direction presets

Hosted providers are the default for images and the connection for all new video. Choose optional Local ComfyUI images under Where this renders; Studio remembers that image preference when you return from Video. A local approved image requires Upload local image for hosted video before cost review. That button sends only the selected image to your signed-in DVP hosted storage, verifies the file checksum and dimensions, retains the original local take, and selects the hosted copy. It does not generate video or approve spending. Source-image uploads support PNG, JPEG and WebP up to 8 MiB. The copied file is unchanged; generated results can still alter visual details.

Preview the fields a preset changes, then apply it. Presets guide the model; review the resulting image or motion before approving it.

Generate keeps unapplied direction separate from Direct. In Recorded generation details, a hosted take with complete saved authoring offers Review recorded direction: images preview action, camera and look as shot overrides; videos preview action and camera motion. Review and Apply uses one undoable creative edit and requires fresh cost review. Current cast, references, source still, dialogue and continuity stay selected. Historical model, seed, duration, resolution and provider options are shown for inspection and are not automatically selected. A take with only a recorded action can load that action into a draft. For an older take, Retrieve older request details reads its saved execution request without starting another render; older authoring may still be unavailable. Apply or discard each draft before cost review. Video presets guide motion; return to the source image to change its appearance. A raw prompt override omits structured preset controls.

Direct is your editable storyboard. Search for a shot, filter for missing direction or images, and use Next shot needing attention to continue. If direction changes after generation, the approved take stays safe and gets a review notice. Keep current take records your review against the current settings; it does not rewrite the image's generation history. Older takes may show Original settings unavailable.

Production look in Prepare sets shared look and director guidance. Direct shows each effective value and its Production, Scene or Shot source. Clear value removes that value from the image direction; Use inherited value resumes the shared setting. Shared changes and reference replacements show an impact preview before Apply. Vary this shot and Apply direction to selected shots let you choose which field groups to preserve or change; preservation records intent, not a visual guarantee. Action continuity records start/end descriptions, screen position and prop holder/hand/state. Previous-end copying is always previewed and explicitly applied.

Suggest direction sends your brief and the current shot’s written context to Claude using your own Anthropic key; that text request may incur a provider charge. It returns editable, individually selectable camera, action and lighting suggestions for this shot. Preview their impact before Apply. Linked action references cannot be rewritten by the suggestion. Applying direction does not generate media or approve a take; use the ordinary model and cost review if you later want a new image or video.

Open Direction history and checkpoints in Direct to undo committed direction or redo it. Typing until blur is one edit; a bulk Apply is one edit. Studio keeps up to 20 session edits within 256 KiB and tells you when earlier edits have been removed. Text fields keep their native undo. Creation, duplication, deletion, ordering, membership and raw source-library changes use their existing controls. Embedded scene direction and variant changes are included; source images and entity records are not rewound.

A named checkpoint includes production defaults, selected shots (up to 20), and optionally the current scene's creative settings. Keep up to five checkpoints, each within 64 KiB and all within 256 KiB; the whole production still has its 2 MiB portable limit. Capacity errors require deleting a checkpoint or choosing fewer shots. Preview restore at the current revision before Apply. Missing objects, stale exact references, unavailable media or a relevant concurrent edit block restoration; Studio never recreates or remaps them. New media, jobs, approvals, review records, payments and cuts remain saved. Restored direction may require fresh review and cost checking. Restore counts as one undo edit.

History clears when you switch production, import a backup, replace it with the account copy or reload. Checkpoints survive in sanitized production backups; editor handoffs and client deliveries omit this private history. A failed device save keeps the attempted draft and original undo position; retry the same action. Failed account saves are visibly device-only; account conflicts must be resolved before history application. Only an owner or editor of an active production can create, delete or restore checkpoints.

Continuity assistance compares metadata and references. It cannot guarantee visual identity in a generated image. Intentional changes can have a continuity note; invalid references still need repair.

Open Storyboard in the production bar from any workspace. Before generation, each shot has a text placeholder. As stills arrive, the board fills automatically: approved images stay in place, while shots without an approval show their newest non-rejected image as Candidate — not approved. Approving a video keeps its source still on the board.

Whole production groups every shot by scene, including shots outside sequences. Choose a sequence to see its playback order. Open shot returns to Direct; Review takes opens Images. For a shot outside every sequence, open it in Direct and explicitly include it before sequence review. Browsing the board never starts generation or approves an image.

Reference needs declares a source, view and required outfit or lighting match. Available means a matching image has a current human review; Bound means that exact saved image/version is selected for this shot. A thumbnail or approved identity does not attach it.

Choose Prepare in Forge to upload an existing view without provider credentials or explicitly generate one. Check the requested context beside the identity, choose Review this reference, then Use for this shot. The picker shows the exact replacement; other shots retain their references. Replacing a reference creates a new panel and preserves prior images and takes. Changed image bytes, identity, context or selected variant descriptions make review outdated; review again before using it.

Editorial purpose records intent without changing the generation prompt. Blocking notes still direct screen position and eyelines. Select a sequence and choose Preview sequence for a still-only pacing check. Candidate and approved labels stay visible. Unknown timing uses a labeled Assumed 3s hold for playback only; known runtime excludes unknown durations. Preview never saves durations or starts a provider request.

The storyboard is available inside Studio only. It does not create a separate copy of your production, and an unavailable image stays labeled rather than being replaced with a different take.
+

Asset library

Reuse what you already made.

Browse asset library sits next to Create scene in Shots and lists characters, locations, scenes, and sequences saved in CastLock on this device. Start from asset library in Plan lists scenes and sequences. Pick one and choose Use a copy. Studio adds an independent copy to this production. The CastLock original does not change, and nothing you do to the copy reaches it until you say so.

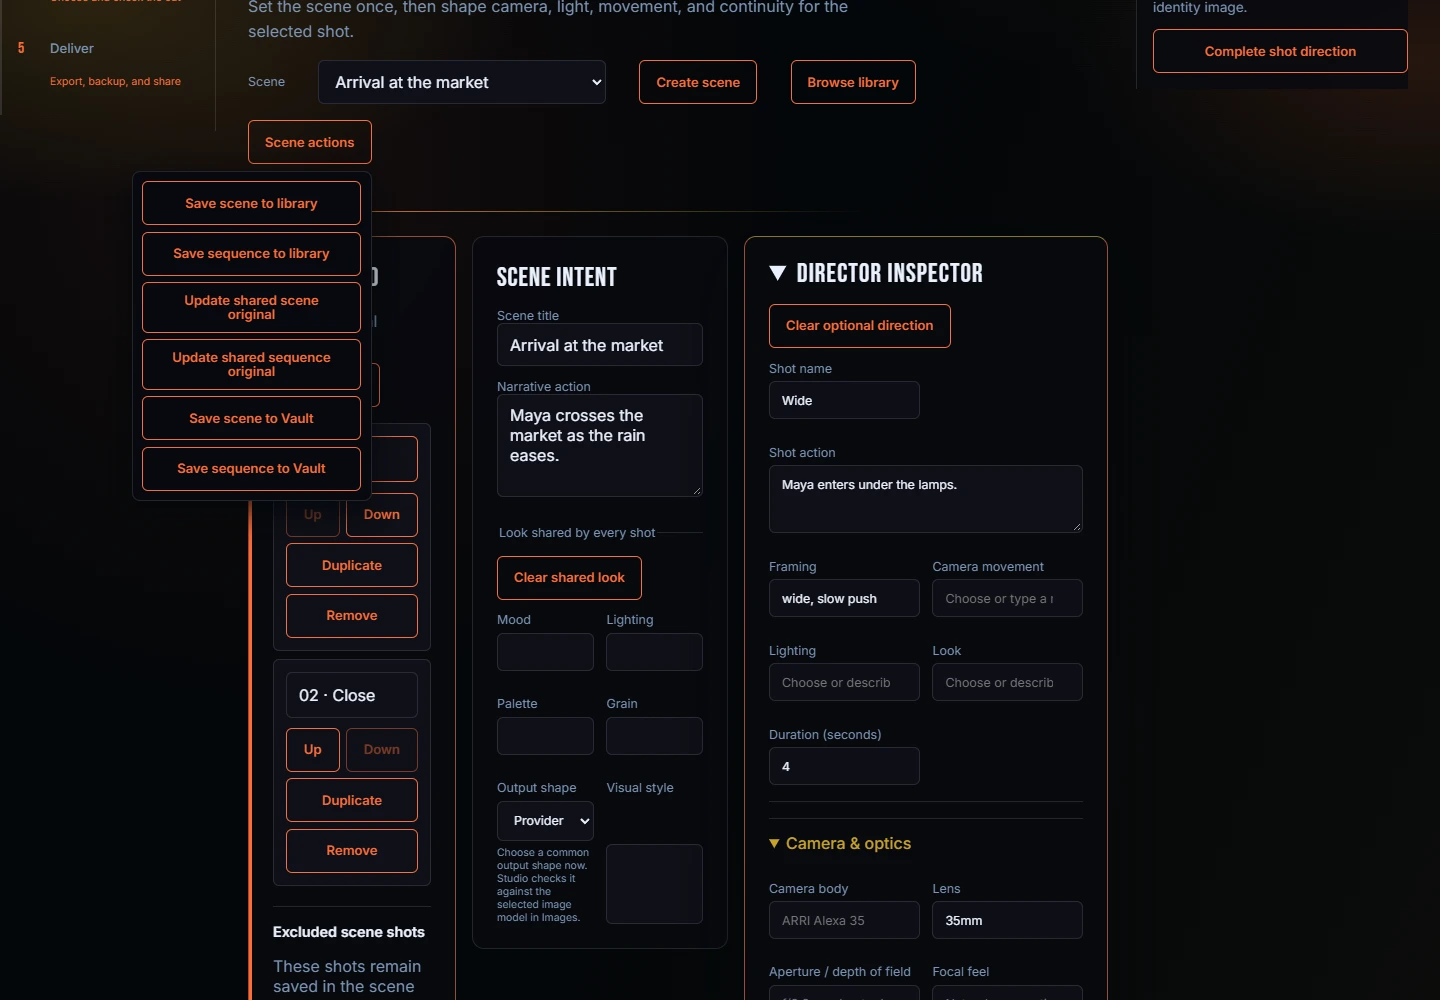
Scene actions, also in Shots, is where the copy talks back. Save scene to library or Save sequence to library puts a new original in CastLock and links the copy to it. Update shared scene original or Update shared sequence original only appears when the copy is linked. It rewrites the original with your edits, but first it checks whether the original changed since you took the copy. If it did, you get three choices: Keep original, Save as new, or Replace shared original. Replace reads the original once more before it writes. Your production keeps its edits whatever you pick, and other productions keep their own copies.

For a character made or edited in Studio, Save draft in the character editor or Save and use in scene saves a complete character under the same ID in CastLock Library and DVP Vault. Later saves update those entries. Wait for the CastLock and Vault confirmation; if Vault fails, the Studio and CastLock copies remain and you can retry. An incomplete character stays a Studio draft until its name and identity details are ready.

For a location in this production, open Prepare → Cast & Set and choose Save to library and Vault on its location card. This saves the location and its reference-image links to CastLock Library and DVP Vault → Reusable Library, without saving its scene, shots, or production there. Wait for Location saved in CastLock and Vault on this device before starting another production. Later saves update the same entries; a conflicting CastLock edit is kept, and a failed Vault save can be retried. Both libraries and their reference images stay in this browser profile.

Save scene to Vault and Save sequence to Vault put a snapshot in DVP Vault on this device. A Vault record is a saved copy, not an approved cut, and it stays in this browser. From Vault, Use in Studio brings it back; Studio asks where the copy should go before it adds anything.

To import a character from Vault, open DVP Vault → Reusable Library in the same browser profile as Studio, select the saved character record, then choose Use in Studio under Actions. In the Studio tab, choose Add a copy here or Start a new production. Find the copied character in Prepare → Cast & Set and add it to a scene. An empty Reusable Library means no character has been saved to Vault in that browser profile. If the character is already in CastLock, use Studio's Browse asset library instead, or choose Actions → Save to Vault on its CastLock card first. A Vault prompt tagged character describes one; it is not a reusable character record. Use the prompt and portrait to create the character in Studio when no CastLock record exists.

A reference image that is not on this device shows as missing on the copy. The direction still works. The shot is just not ready to generate until the image is.

What the status line says“Shared original updated: “Market arrival”. Other productions keep their own copies.”
Studio Shots stage with the Scene actions menu open: Save scene to library, Save sequence to library, Update shared scene original, Update shared sequence original
Scene actions Save to library, update the shared original, or save to Vault
5

Images

Make, compare, and approve the frame.

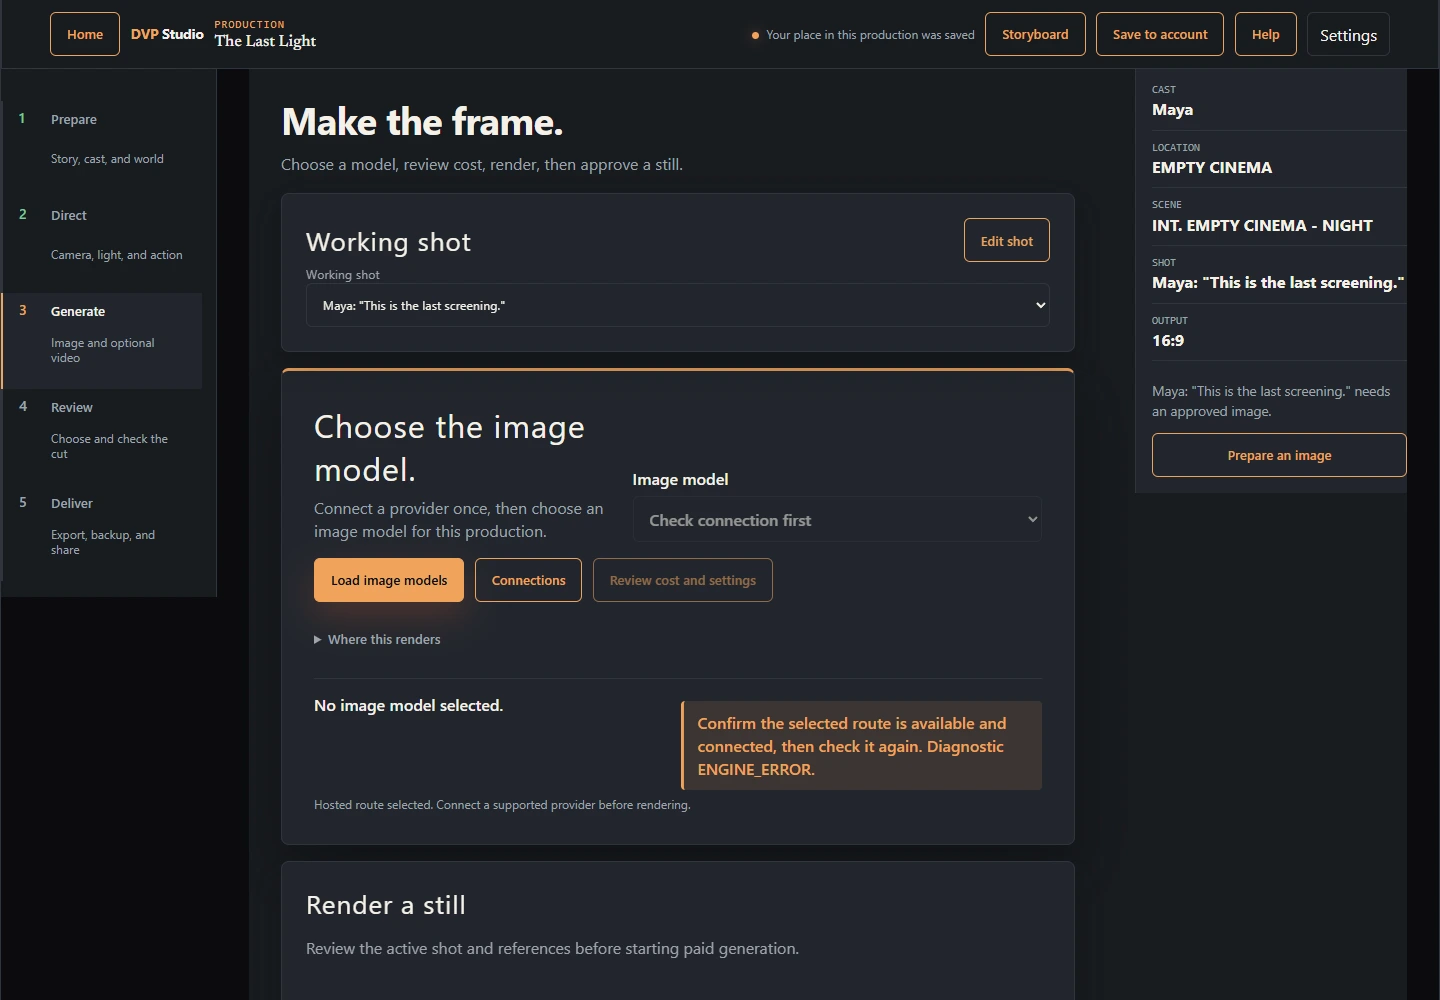
Image rendering contacts a paid provider only after your explicit review. Creating reference images earlier in the workflow can also be paid.

Review a batch before rendering

Shot variations create two to four alternatives of one image. Animate selected shots creates videos from one to five approved stills you choose, in sequence order. Review the individual requests, exact source versions, settings, and maximum total cost before starting either batch. Each alternative or shot is a separate request, processed one at a time.

Check the consent box and choose Start to accept the reviewed batch. A quote expires after 15 minutes. Changing the source, selection, or settings requires a new review. Completed takes remain available for your own approval; a batch does not replace your approved cut.

Reopen the saved production to see progress after a lost connection. If a submission or its charge is uncertain, recover that saved run before considering another attempt. Only eligible failed or unsent items offer a new retry review. Cancel stops unsent work; a submitted request can still finish and charge. Saved progress and recovery remain available when new batch rendering is disabled.

Open Jobs in this production in Generate to see recent individual renders and the selected run in one place. This is a status view: use the existing render or run controls for review, recovery and cancellation. It does not start a request or poll on its own.

Batch rendering requires an enabled account and a compatible connected model. If it is unavailable, Studio explains the block; individual rendering remains available according to your account and provider settings.
  1. Open Generate. The image-model console is the first control beneath the phase heading.
  2. Load image models. Studio checks the selected rendering connection and lists every compatible model. If none appear, open Connections and add a Runway API key or another supported provider key.
  3. Choose the image model. Pick a best-match, budget-reference, or prompt-only model. Studio automatically uses the model’s reference endpoint when the shot contains references.
  4. Review the selected shot. Confirm the cast, location, direction, output shape, and approved references shown at the top.
  5. Choose Review cost and settings. Read the provider, model, and maximum charge.
  6. Confirm the exact receipt. Only the final render button starts the paid request.
  7. Approve the best take. Rejected and earlier results remain available; approving does not delete them.
You stay in control. Opening Connections, checking a connection, moving between stages, and reviewing a price do not spend money. The paid render button does. Studio blocks a second paid still while one is unfinished for the same shot. If the current maximum price rises above what you reviewed, it clears the old approval and asks you to review the new price.
Studio Images stage before a provider is connected, showing Load image models and Connections
Example before connection: load models or open Connections. Cost review becomes available after setup.
6

Video

Animate the approved image—or skip it.

Video is optional. Studio tells you exactly which approved image, version, and output shape will be used before it offers a paid animation.

  1. Approve an image first. Video never guesses which frame to animate.
  2. Check the video connection. If the selected provider or model cannot make this clip, Studio explains what is missing.
  3. Review duration, shape, source, and cost. Confirm the exact receipt before the paid button unlocks.
  4. Approve the video take. It remains attached to the same shot as its source image.
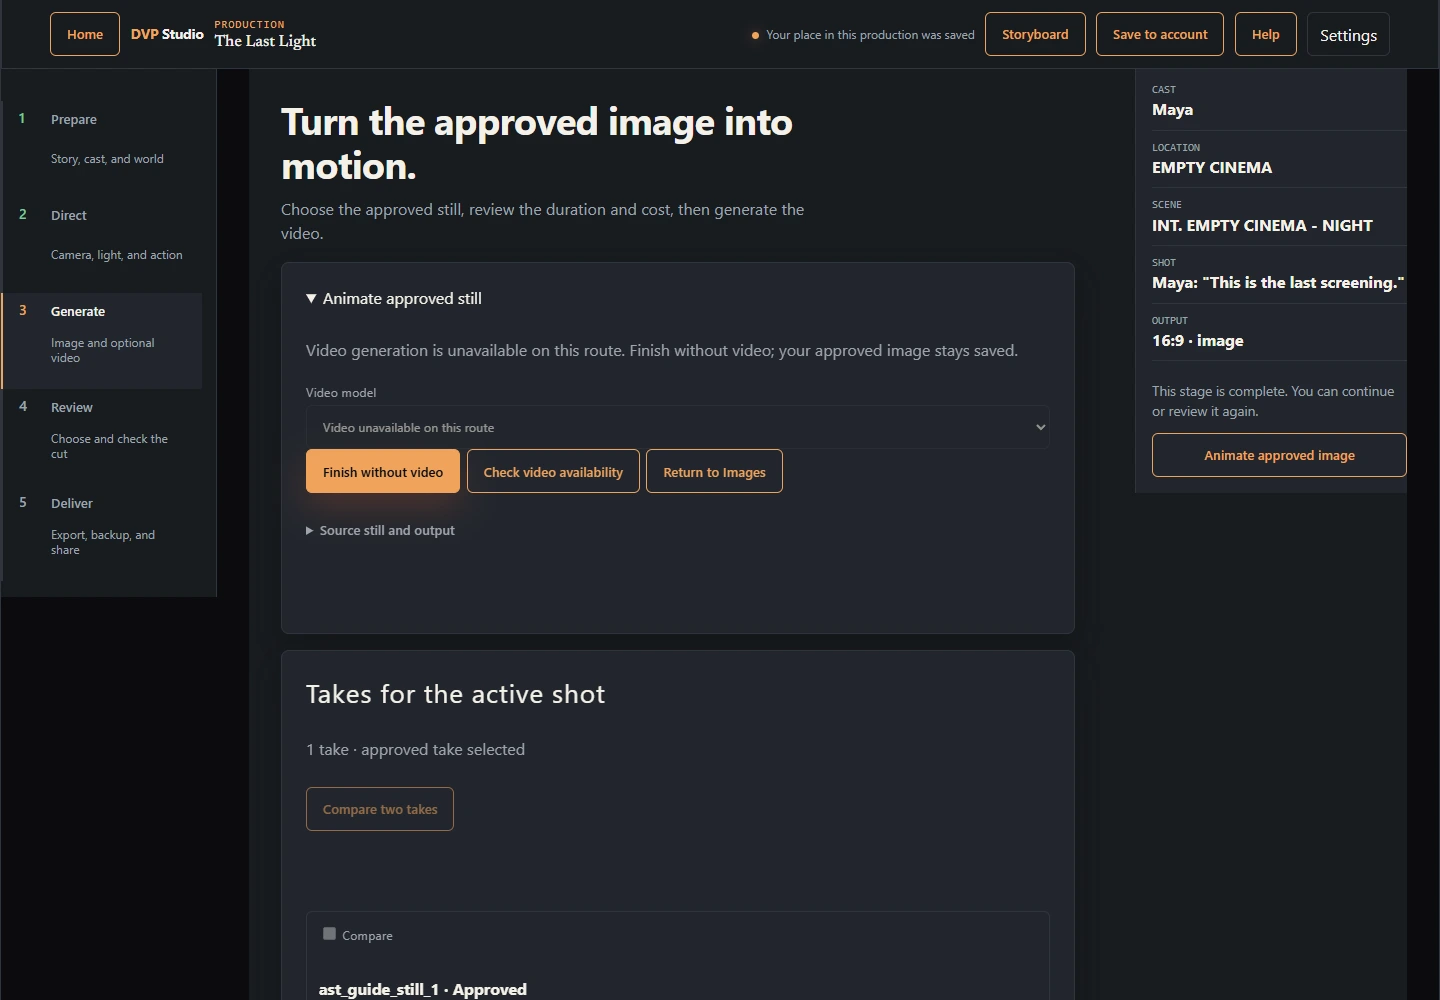
  5. Only need a still? Choose Finish without video (or Skip video when shown) and continue to Review. You can return later.

Changing a shot after reviewing a video or re-voice plan makes that plan stale. Review the source, settings, and cost again before submitting a paid request.

Changing a finished take: Changing the cast, reference, or direction affects a future render; the existing approved image or video stays saved until you review a new take. For a still with one character, Replace character prepares a new render using a different approved CastLock identity; review its references and cost before rendering. Masked replacement of one person in a multi-person image and character replacement inside an existing video remain unreleased. Advanced video and re-voice controls may appear, but their availability depends on enabled providers and features.
Studio Video stage showing an approved still and an unavailable video route
Example without a video connection: the approved still stays saved; check availability or continue without video.
7

Review & Deliver

Lock the choices and take them with you.

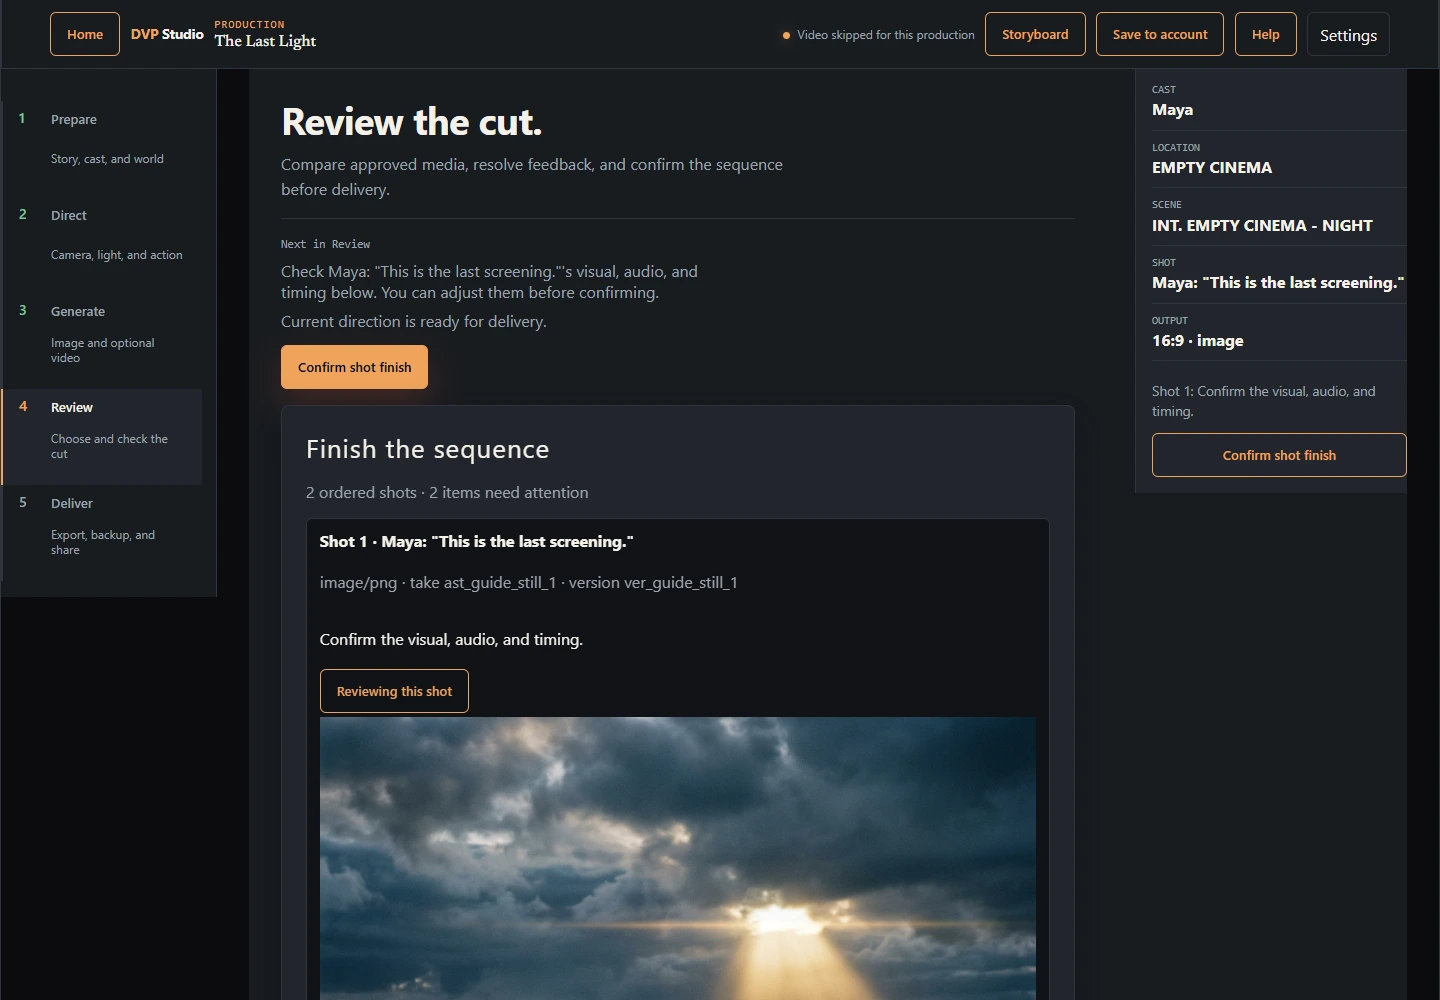
Review brings the approved shots together and shows what still needs attention. Deliver lists the approved image or video files first, then optional production JSON, backup, and private client review.

  1. Review the shot-to-shot sequence. Move through approved takes and check that the order feels right.
  2. Set the final timing. Choose the visual, audio option, and safe trim points.
  3. Resolve anything in Needs attention. Studio keeps blockers separate from optional continuity advice.
  4. Confirm each shot finish. This saves the chosen visual, timing, and audio for delivery.
  5. Download the approved media files in Deliver. A combined video is offered only when one has already been assembled. Your browser may open an external media link instead of saving it.
  6. Download production JSON for a trusted editor when the sequence is ready. It contains production data, an editor handoff, and media references, but no media files. The separate production backup JSON is for recovery and also excludes provider keys and media files. Use Client review to share only an approved package, never the working Studio.
Account and device saves: Choose Save to account in the production header, even before rendering. Studio backs up the character and location images, keeps all shots and take history, and shows Settings → Reopen production after a complete save. Later edits sync to that account copy. If a save fails, keep the tab open and follow the on-screen recovery choice before doing more paid work. A failed creative-direction save keeps the attempted edit as a retryable draft; other failed actions may restore the last verified device copy. Check the message before continuing. An account conflict needs a decision about which copy to keep. A production backup excludes media files, so use the media archive below for separate copies of generated images and videos.
Studio Review workspace showing the approved sequence, timing controls, collaboration tools, and delivery actions
1 Check the sequence2 Set timing3 Export safely
+

Local media archive

Keep a separate copy of generated media.

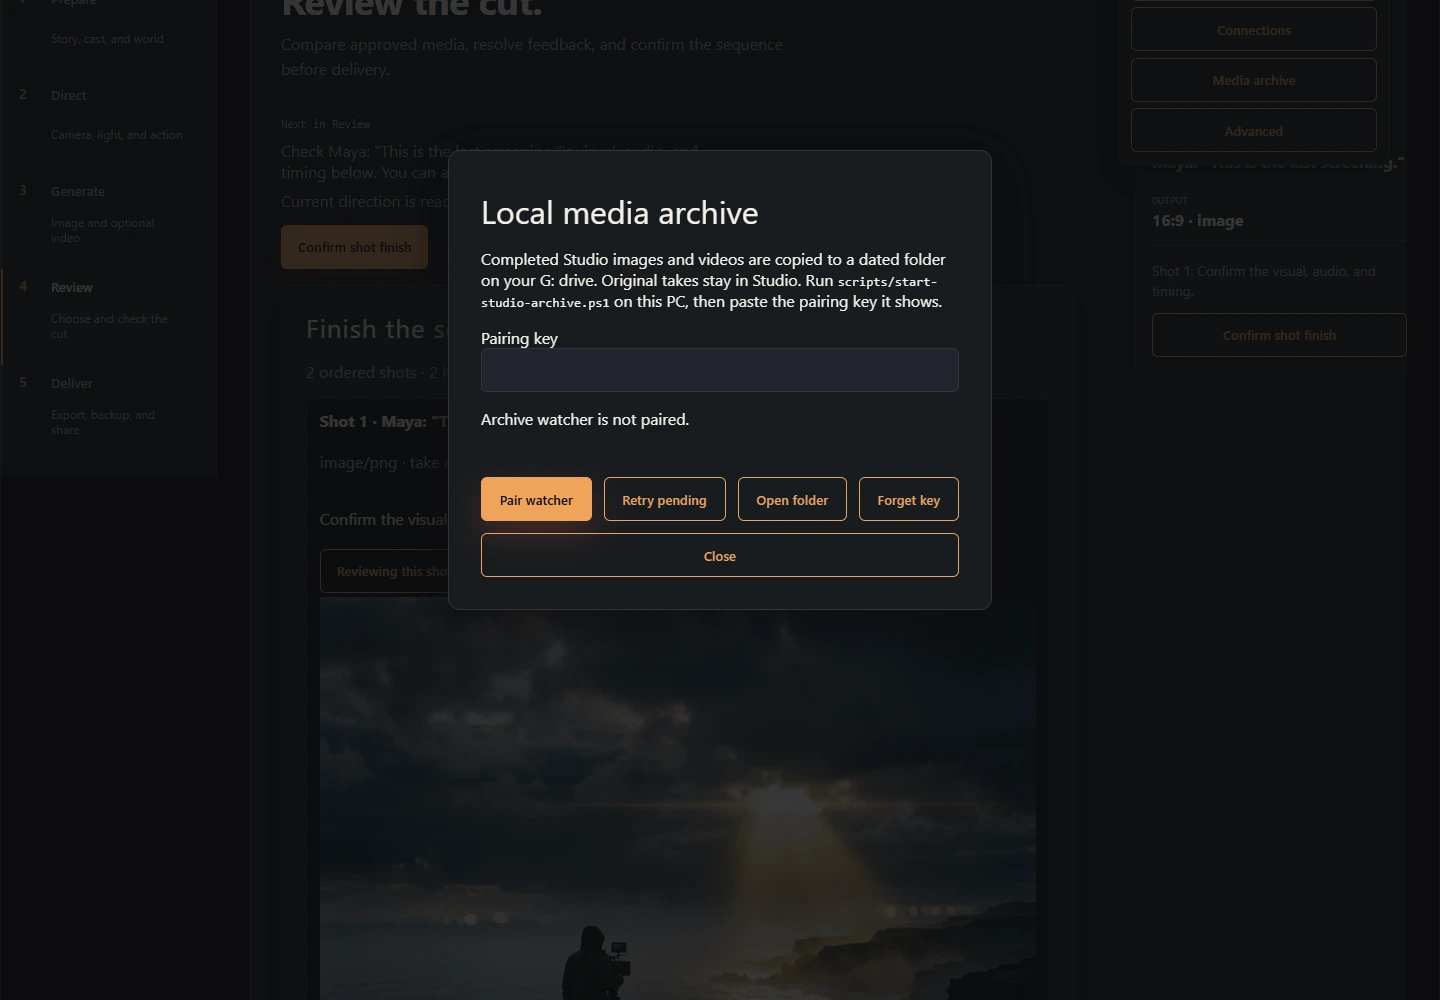
On the configured Windows PC, Studio can copy completed generated images and videos to G:\DVP_Studio_Archive\images\ai-generated\YYYY-MM-DD and G:\DVP_Studio_Archive\videos\ai-generated\YYYY-MM-DD. The originals stay in Studio. User uploads and media imported from other apps are not copied by this archive.

  1. Make sure the local companion is running. On this Windows PC, it may already start when you sign in. Otherwise, run scripts/start-studio-archive.ps1 from the website project folder.
  2. Pair only the first time in this browser. Open dynamicvibe.net/studio/ in your normal browser, choose Settings → Media archive, enter the companion's pairing key, and choose Pair watcher. Allow the browser's local-network prompt if it appears.
  3. Check the status. The dialog shows whether the companion is connected, how many copies are pending, the last archived item, and any errors. Open folder opens the configured archive root.
  4. Let Studio catch up. If the browser was closed or the companion was stopped, reopen Studio on this PC. It scans saved completed takes again and retries pending copies while open. Use Retry pending after restoring a disconnected or full drive.
Already paired? Do not enter the key again just because you reopened Studio. The key stays in this browser. Pair again only after clearing this site's browser data, using a different browser profile or PC, choosing Forget key, or changing to an archive root with a different key. A connected status still needs one real file check in the dated folder before you rely on the archive.
Studio Settings menu with the Local media archive dialog, pairing, status, Retry pending, and Open folder controls
Example setup screen. A previously paired browser shows its current connection and pending count here.

When something stops

Most problems have one next step.

Open the question that sounds most like what you see.

Do I need a script?

No. Choose Start with a shot, describe the action and location, and choose No recurring character in this scene for a simple image. Cast & Set and detailed direction remain available when needed. Video is optional.

Studio says the provider is not connected

Open Connections, add or replace the provider key, close the panel, and choose Load image models again. A managed beta invitation and DVP Account sign-in may be required for hosted production features.

The paid render button is grey

Choose Review cost and settings. Fix any missing cast, location, reference, shot, or output detail, then acknowledge the exact receipt.

A render was interrupted or the tab closed

Return to the same production and choose Resume render jobs. Studio checks the existing job instead of intentionally starting and charging for another one.

An account save failed or says there is a conflict

Keep Studio open. If the account accepted the save but this browser could not adopt it, choose Retry account save; Studio adopts that accepted copy before sending newer edits. If the account copy changed elsewhere, use the conflict choices to download your device copy or load the account copy only after checking what each contains. Do not start another paid render until the save state is clear.

My archive says stopped or has pending copies

Check that the local companion is running and the G: drive is available. In Settings → Media archive, read the listed error and choose Retry pending. If your browser asks for local-network access, allow Studio to reach this PC. A stopped companion does not mean you must pair again; reopen Studio after it starts so saved results can catch up.

Can I replace a character in an existing video?

Not yet as a released Studio action. You can change a shot's cast or references and generate a new take after reviewing its cost, while the earlier take remains available. Masked replacement of a person in an image is still being tested, and direct replacement inside an existing video is not available in Studio.

Can I practise without spending?

When it is available, the Fake provider runs a zero-cost practice cycle. It creates test results rather than contacting a paid provider.

What are Review every promotion and Autopilot?

Review every promotion pauses for your decision at each important stage. Autopilot follows one locked, pre-approved plan and stops if that plan or its cost changes.

A character needs a reference

Open Create or update character references from Cast & Set, restore or create the reference, and approve it. Then return to the scene and choose that source again.

How do I reopen my work later?

First choose Save to account and wait for confirmation. Return to dynamicvibe.net/studio/, sign into the same account, and choose the production in Home. Its title and production ID identify the correct copy. You can also use its Settings → Reopen production link on another signed-in browser or provide that link when requesting help. Continue work saved on this device opens the browser-only workspace.

My saved production has older individual-render history

Account saving keeps that history and its images. Continue rendering individual shots through Review cost and settings. Older history may prevent batch enrollment when it cannot be verified against a server run; Studio keeps the production and explains that restriction rather than deleting its takes. Where sequence rendering is enabled for your account, eligible Quick sequences use reviewed batches of up to five shots.

Can I upload my own location, character or object photos?

Yes. In Prepare → Cast & Set, choose Upload photos under Characters, Locations or Objects. Name a new record or choose an existing one, then select up to four JPEG, PNG, or WebP photos (8 MB each). Name each photo, review the thumbnails and choose Save and approve references. Exterior and interior angles can share one location; different looks can share one character; front, side and detail views can share one object. Add more photos later using the same record. Uploading does not use AI. In Direct, select a shot and choose Add reference to pick its exact photo by name and thumbnail. Each shot keeps its own choice. Choose Save to account to back up the images.

How do I use a different angle of the same location?

Upload your existing photos using Upload photos in Cast & Set, or prepare additional views in the location editor. In Direct, select the shot and choose Add reference to pick the exact exterior or interior photo. You can also choose Location view for this shot under Cast and continuity. The preview and image cost review show the selected view. Each shot keeps its own choice. If you regenerate that view, choose it again before rendering.

Can I choose a specific character or object reference?

In Direct, choose Add reference or type @. Pick the saved view or approved uploaded reference listed under the asset's name. Choosing a different view of an already bound asset replaces that shot's reference. Other shots keep their choices. Object references require a model that supports props; the cost review blocks unsupported models.

Can a shot contain only one character?

Yes. In Direct → Advanced direction, use Characters in this shot to select only the characters visible in that shot. Choose no characters for an empty-location shot. Keep the location selected so its approved reference preserves the room. Changing the shot cast keeps the other characters and their images in the production.

Can I make more than five shots?

Yes. In Direct, choose Add shot for each beat and Add scene when the scene changes. Use Storyboard to inspect the whole production and each sequence's order. Render and review individual shots in Generate. If reviewed sequence rendering is enabled for your account, select at most five shots per paid batch; that limit does not restrict authoring.

How do I share with a reviewer or client?

Use Members and review for a signed-in collaborator. Use Client delivery for an approved package. You can revoke access if a private invitation reaches the wrong person.

What if account access or a paid job looks wrong?

Stop before starting another paid job, keep the production open, and use DVP support. Include the safe request or job reference, but never send a provider key, password, invitation link, or client link.

You are ready

One idea is enough.

Start from script or start with a shot. Studio will keep the cast, location, camera direction, approved image, video choice, and final delivery on one visible path.

Open DVP AI Studio